Showing posts with label Mod. Show all posts

Sep 3, 2015

New Classical Acoustic Guitar Tuners


          I received a set of replacement tuners for my Juan Estruch classical acoustic guitar, to replace the old and partly broken set of original tuners.  Stay 'tuned' for upcoming projects!

Jun 30, 2015

"Souped Up Amp" with wah


The "Souped Up Amp" is still going strong after two years, and turns out it works pretty well with a wah pedal too!


Jun 24, 2015

Enter Mandolin - Rogue RM100A


Installed a pair of cheap piezoelectric pickups into my Rogue RM-100A Mandolin, time to rock out!
Review and pics coming soon :)

Apr 15, 2015

Metal Humbucker Pickup Covers Review


          Looking to change the look of one or more of my guitars, I decided to take a chance on some cheap metal pickup covers from Amazon for new style without a lot of work or money.  Worth the low price?  Maybe...


Feb 16, 2015

Further Strat Modifications


          Because I just can't leave my cheap Squier Strat alone, I did another round of mods to it, mainly to increase tuning stability and dampen crazy spring reverb.

More after the break.


Feb 8, 2015

Strat Pickguard Replacement


Recently ordered and received a new prewired pickguard from Amazon.  So far I'm extremely happy with it for what I paid :)  

Many pictures after the break.


Jan 26, 2015

DIY Fretcam


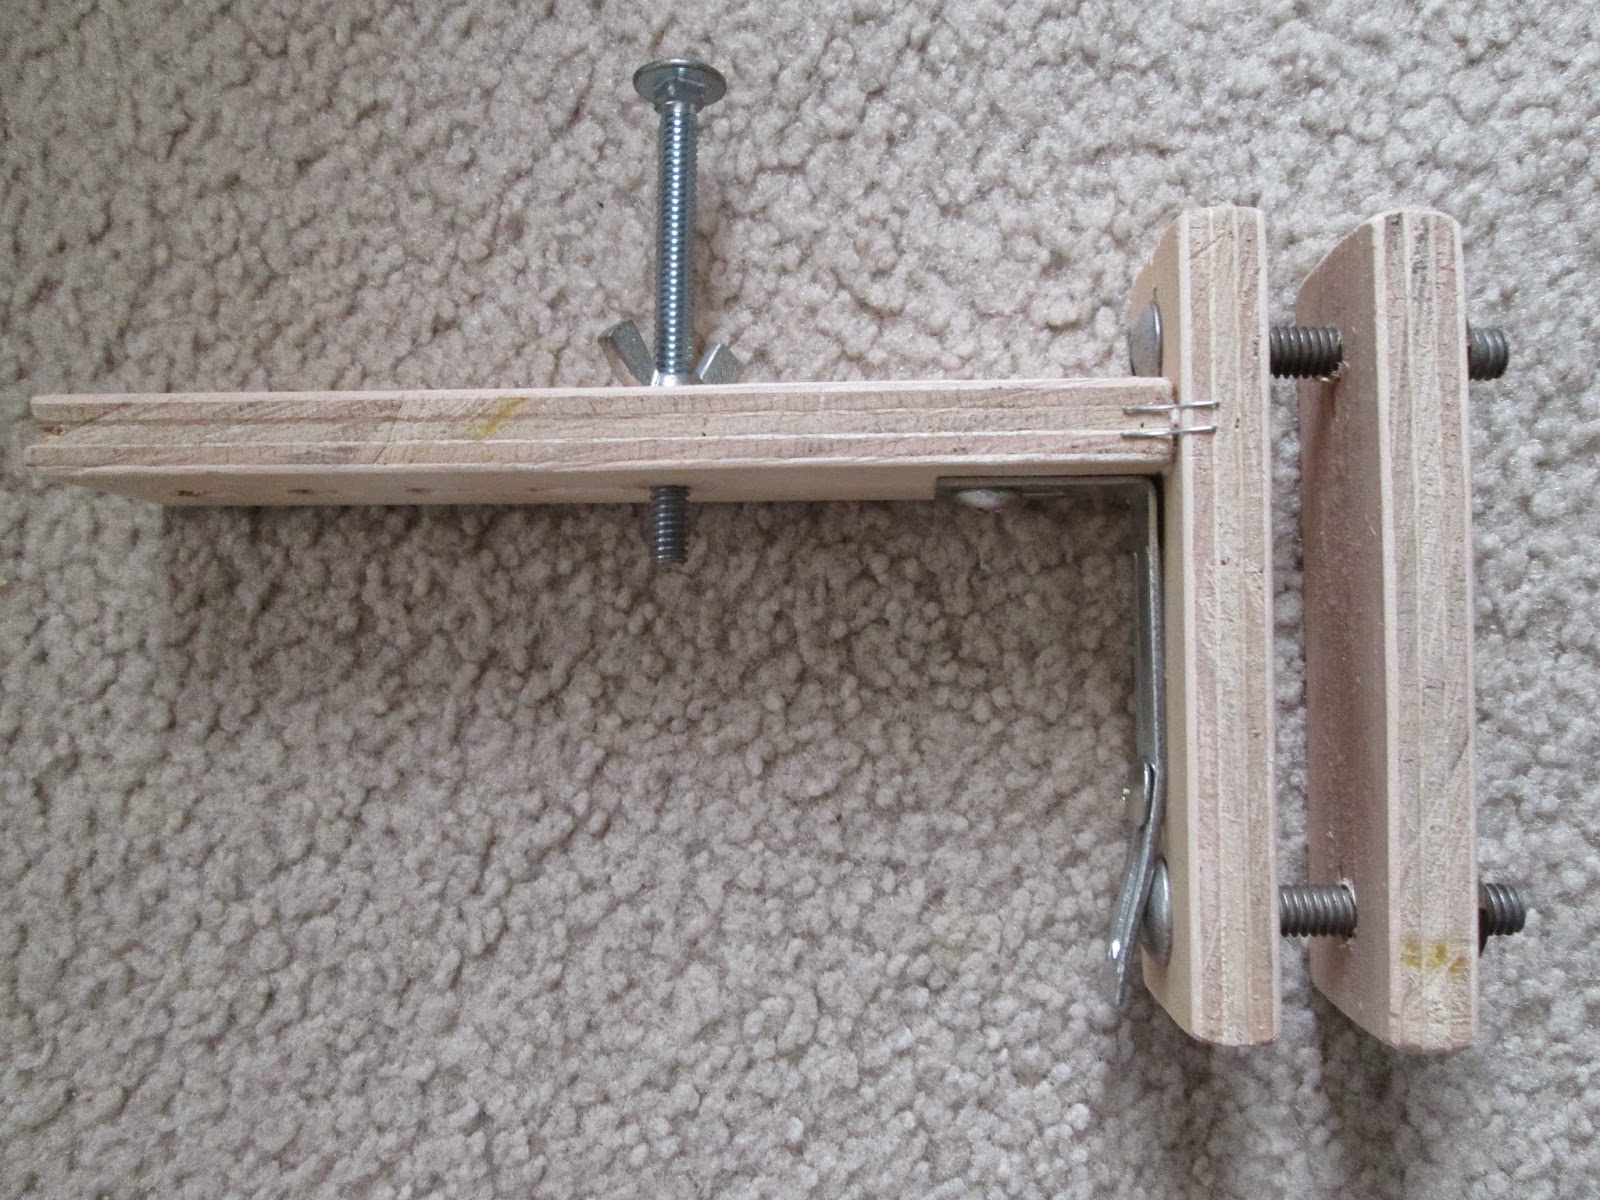
          What's that strange wooden device there?  Why, it's a guitar headstock fretboard camera mount of course!  A "fretcam" mount like this is a simple device (like a tripod) for mounting a camera to the headstock of a guitar, allowing a camera to video down the fretboard as you play.

          Construction was simple, just three pieces of wood cut and sanded to 1/2" x 1 1/2" x either 4 1/2" (shorter two pieces) or 5 1/2" (longer piece).  The two shorter pieces are held together by bolts and work as a clamp to hold on to the headstock.  The longer arm at 90 degrees holds the camera by it's threaded mount.  I drilled five different holes through the longer arm, which allows the height to be adjusted, and the camera can be tilted to the desired angle.

          It's not perfect, but it's easy to make and quite effective if used right.  Below I have some examples of the fretcam in action.


Jan 23, 2015

Pedal Chain

Current pedal chain
          Here's my current footpedal setup, though it's extremely simple.  I'm currently only using three pedals, two of which I only occasionally use.  From left to right:

Joyo JF-2 Ultimate Drive - Very nice overdrive/distortion pedal for just $30.  Only used sometimes because I can get plenty of different overdrives and distortions from the amplifier.

Homemade Passive Signal Modifier - Has a couple different, mostly subtle, effects.  This functions like an extension of the tone and volume controls in the guitar, with a more variable tone knob that can cut either treble or bass, but reduces the signal greatly.  Also has a passive diode clipping control to allow a slight natural overdrive.  Honestly the best part is that it is entirely battery and power source free.

Homemade A/B Selector Switch - This is the most basic footpedal possible - and also my most used pedal.  Made from an old hard drive case, it's just an input jack and on/off switch.  This allows changing between two presets on the amplifier.  Extremely useful.

Jan 21, 2015

Graphtech TUSQ Nut (42mm Strat)


          A brief review of the Graphtech TUSQ nut, installed as an upgrade to the original nut on my Squier Bullet Stratocaster.  An overpriced but very functional upgrade to almost any guitar in regards to tuning stability.

Full review right after the break.

Jul 12, 2014

Adventures of a Strat part 3


A picture is supposedly worth a thousand words so I shouldn't have to say very much. 

Unfortunately I couldn't get a better pickguard and pickup, so I used what it had before, the stock pickups wired in series. 

Surprisingly though,  the combined output of all three checks in at 11k ohm, while just one of my Schecter Omen's humbuckers has near 15k ohms.


It's not all bad though.  The reason I couldn't get replacement parts is actually because I found a much better deal.  Musician's Friend is having a "July Shredfest", so I bagged a Rogue Rocketeer electric guitar  at just $60.  

The total for that with some picks, strings and cables was still no morethan I would have spent upgrading the pickguard, pickups, nut, saddles, string trees and what have you on this guitar.

Perhaps soon you will see a new series - the adventures of an even cheaper guitar, highlighting my efforts to make a professionalish guitar for under 100 bucks :)

Jul 2, 2014

Update on Strat build

Progress!


     My project Squier Strat has now progressed from a pile of pieces back into an almost complete guitar again.  Sounds sweet no?  Here are a few other modifications I made to it:


  • The obvious one - put a block of wood in the neck pickup cavity.  Why?  Hopefully it'll help increase sustain.  Maybe it will help shield something.  Maybe it will keep bugs from living in the empty hole where there isn't a pickup.  Who knows!  There are no rules to guitar building!
  • Also added a solid steel tube I found.  Why?  It fit perfectly.  Also see above.
  • Blocked tremolo.  A really common mod and hopefully a very useful one.  I only used two of the rear springs, mostly to keep it all grounded, and also because the wood was so tightly fit that there was no way springs were necessary.  This should dramatically help the two biggest problems I found this guitar to have - sustain and tuning.
  • Some other little stuff too.  Mostly making everything fit perfectly flush, a little sanding here and there, a touch of glue in some of the screw holes.  Also overtightened the input jack by removing one of the nuts and cranking it tight, since it kept coming unscrewed.
     The only thing left is getting a good pickguard and pickup, maybe a little bit of wiring, and intonation setup and it'll be all set to go!

Jun 30, 2014

How to paint a Squier Strat

     I decided to give my Squier Strat a new paintjob, since it was mostly collecting dust anyway and I wanted to see how I could make it look.  It's not 100% finished at the moment, but lookin' good anyway.

     Since it turned out so well, I decided to make a tutorial of sorts for those of you interested in doing something like it.


   Writeup and lots of pretty pictures after the break.

Mar 16, 2014

Altoids Headphone Amp


          Here we have another simple LM-386 amp I made, this one made in the style of all the Altoids tin amps out there, though I used an aluminum gift card case instead of an actual Altoids tin.  I really like this one because it is so simple, sturdy and portable.

          I didn't draw out a schematic but it is pretty much another Smokey amp.  The differences are that it has no switches, power is turned on and off by the input jack, it has a 220 uF cap on the output, has a cluster of resistors on the output to reduce volume, and uses headphones instead of a speaker.


          So what is special about it?  Well, while it's not unique, it does have some nice features.  The casing was perfect because it was exactly the right height to accomodate the two 1/8" jacks and the 9v battery.  Pressure from the lid actually holds the battery from sliding into other stuff it shouldn't.  Also, the casing is all aluminum so acts as shielding and conducts the ground between the two jacks.  And fits into a pocket ;)

          The cluster of resistors is the simple volume control I made by experimenting around with resistance.  The resistors are a mix of three 39,000 ohm resistors and four 22,000 ohms which puts total resistance at 3,864 ohms.  If you had four 10,000 ohm resistors in parallel that would work well.  I just added resistors until it was loud enough without being obnoxious.  Another plus side of using lower volume levels and running through headphones not speakers is that there is nearly no audible noise or hum, no doubt helped by the shielding.


          One last thing that I like that makes a headphone pocket amp more fun than a speaker amp is that you can use whatever headphones or earbuds you like and it gives a different tone with each one.  It makes a good judge of headphone quality as well, since higher quality speakers use energy more efficiently and play louder than others.

         That's about it for this amp, there really isn't much to talk about, but it is really great and was a fun half-hour project.  I'd suggest something like this for a great first build, or an easy side project for more experienced engineers.  Pictures coming soon, peace out.

Jan 10, 2014

Science Fair Experimental LM386 Amp


          You may have seen my "Souped-Up" amp already - my first shot at DIY amp building, cloned from the Smokey amp.  I did mention how these projects are addictive, and now here we are with my science fair project.


          In case you have no idea what you're looking at (it is a pretty weird little amp) it is the son of a Noisy Cricket and a cigar box amp.  Put together one LM386, one 4" speaker, six potentiometers and a wooden craft box and this is what you get.

Lots more after the break.

Dec 6, 2013

My "Souped Up" Amp


          One part of being a guitar player that can get really interesting is exploring the DIY amp and stompbox route.  As part of a science fair project I built this amp and another one coming up soon.